Timely Engine Oil Change: When Your Check Engine Light Speaks

Engine Oil Change


Check Engine Light: Is It Time for an Engine Oil Change? That glowing check engine light sparks worry. Is it a minor glitch or a critical message for an engine oil change? We decode this warning, exploring if it truly demands fresh oil to safeguard your car’s health and restore your calm. Understand this signal and act confidently.

But what about oil changes? Could your check engine light be trying to tell you it’s time for an Engine Oil Change? Imagine driving down the highway, enjoying your favorite playlist, when that little orange light appears. You feel your heart skip a beat, questioning whether you should pull over or keep driving.

You’re not alone in wondering what it means and whether it’s related to an overdue Engine Oil Change. We’re diving into the role of the check engine light and whether it indicates that your car needs an oil change. We’ll clear up the confusion, providing you with essential insights to keep your vehicle running smoothly. Understanding this can save you time, money, and stress. Read on to discover the truth behind your check engine light and how to respond effectively.

Check Engine Light Basics

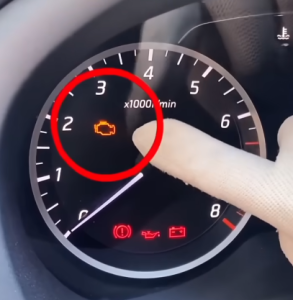
The check engine light is a common indicator on your vehicle’s dashboard. It serves as a warning that something might be wrong with your car. Many drivers wonder if this light comes on due to an overdue Engine Oil Change. Understanding the basics of the check engine light can help you determine its purpose and what actions to take.

Check Engine Light: What It Means

The check engine light is part of your car’s onboard diagnostics system. It monitors engine performance and emissions. When it illuminates, it signals a problem. It could be minor or serious. Ignoring it is not recommended.

Reasons For Activation

Several issues can trigger the check engine light:

  • Faulty Oxygen Sensor: This sensor measures the amount of unburned oxygen in the exhaust. A malfunction can affect fuel efficiency.
  • Loose Gas Cap: A loose or damaged cap can cause fuel vapor leaks, triggering the light.
  • Catalytic Converter Issues: Essential for converting harmful gases, problems here can lead to poor performance.
  • Mass Airflow Sensor Problems: This sensor helps adjust engine fuel intake. Issues can lead to stalling.
  • Misfiring Spark Plugs: These are crucial for igniting the fuel-air mixture in the engine. Misfires can affect acceleration.

It’s rare for the check engine light to activate solely for an oil change. While low oil levels or quality might affect engine performance, the light usually signals more serious issues. Regular maintenance can prevent many problems.

Diagnosing The Problem

Using a diagnostic tool can help identify the issue. Mechanics often use an OBD-II scanner. This tool reads trouble codes stored in the vehicle’s computer. Knowing the codes can pinpoint the exact issue.

Common Issue Potential Impact
Faulty Oxygen Sensor Reduced fuel efficiency
Loose Gas Cap Fuel vapor leaks
Catalytic Converter Issues Poor engine performance
Mass Airflow Sensor Problems Engine stalling
Misfiring Spark Plugs Acceleration issues

Importance Of Regular Maintenance

Regular car maintenance is key. It helps prevent major issues. Schedule routine check-ups. Keep your car running smoothly. Change oil as recommended. Pay attention to dashboard lights.

Seeking Professional Help

If the check engine light remains on, consult a professional. Skilled mechanics can diagnose and solve problems efficiently. They ensure your vehicle’s health and your safety.
Engine Oil Change


Common Reasons For the Check Engine Light

The check engine light is a common sight for many drivers. It can be alarming, especially when you don’t know what’s causing it. For some, the light might seem to pop on for something as routine as an oil change. Understanding the common reasons for the check engine light can help you address issues quickly and avoid costly repairs.

1. Faulty Oxygen Sensor

The oxygen sensor measures the amount of unburned oxygen in a vehicle’s exhaust system. When it malfunctions, it sends incorrect data to the car’s computer. This can affect the fuel-to-air ratio, leading to increased emissions and reduced fuel efficiency. Typically, a faulty oxygen sensor triggers the check engine light.

2. Loose Or Damaged Gas Cap

A gas cap that isn’t tight or is damaged may lead to fuel evaporation. This simple issue can prompt the check engine light to come on. It might seem trivial, but it can impact your vehicle’s fuel system efficiency.

3. Malfunctioning Catalytic Converter

The catalytic converter is crucial for reducing harmful emissions. If it fails, your vehicle may produce more pollution and perform poorly. A malfunctioning catalytic converter often causes the check engine light to illuminate.

4. Bad Mass Airflow Sensor

The mass airflow sensor monitors the amount of air entering the engine. It helps the computer regulate the fuel mixture for optimal performance. When this sensor malfunctions, it can trigger the check engine light, indicating potential engine problems.

5. Engine Misfires

Engine misfires occur when the air-fuel mixture in the cylinders doesn’t ignite properly. Misfires can result from bad spark plugs, poor fuel quality, or damaged ignition coils. These issues often activate the check engine light, signaling a need for immediate attention.

6. Low Oil Pressure

Low oil pressure might not directly trigger the check engine light, but it can cause engine problems that do. Keeping your oil at the right level ensures smooth engine operation and prevents damage.

Table: Quick Fixes For Check Engine Light

Issue Action
Oxygen Sensor Replace sensor
Gas Cap Tighten or replace the cap
Catalytic Converter Inspect and repair
Mass Airflow Sensor Clean or replace the sensor
Engine Misfire Check spark plugs and ignition coils
Low Oil Pressure Check the oil level and refill

Addressing these common issues can help maintain your vehicle’s performance. Regular maintenance is key to preventing the check engine light from becoming a frequent issue.

Oil Change And Check Engine Light

Many drivers wonder if the check engine light can signal an oil change. This light is crucial for alerting you to potential engine problems. While the check engine light is not directly linked to oil changes, it can indicate issues related to your vehicle’s oil system. Understanding these connections can help maintain your engine’s health and performance.

Oil Quality And Sensor Alerts

Oil quality is vital for engine performance. Sensors in your vehicle monitor oil conditions. Poor oil quality can trigger sensor alerts, causing the check engine light to illuminate. Here’s why:

  • Contaminants: Dirt and debris can degrade oil quality. Sensors detect these impurities, affecting engine efficiency.
  • Viscosity Changes: Over time, oil can thicken or thin. Sensor alerts occur if viscosity changes are significant.
  • Oil Breakdown: Oil loses its lubricating properties as it ages. Sensors pick up on this breakdown, prompting warnings.
Sensor Type Function
Viscosity Sensor Measures oil thickness
Contaminant Sensor Detects impurities in oil
Breakdown Sensor Monitors oil degradation

Regular oil changes help prevent sensor alerts. Keeping the oil clean and fresh maintains engine efficiency. If the check engine light appears, inspect the oil quality. Addressing sensor alerts promptly can avoid larger issues.

Oil Pressure And Engine Performance

Oil pressure impacts engine performance. Low pressure can trigger the check engine light. It’s important to understand how oil pressure affects your vehicle:

  1. Lubrication: Oil pressure ensures parts move smoothly. Low pressure means inadequate lubrication, risking engine damage.
  2. Temperature Regulation: Proper pressure helps maintain engine temperature. Low pressure can lead to overheating.
  3. Fuel Efficiency: Stable oil pressure supports optimal fuel use. Fluctuations can decrease efficiency.

Oil pressure sensors monitor these aspects:

  • Detecting drops in pressure
  • Alerting to abnormal pressure levels

Check engine light alerts can appear with pressure issues. Addressing these promptly is crucial. Regular maintenance, including oil checks, can prevent pressure-related problems. For persistent check engine alerts, consult a professional. They can diagnose and fix underlying issues.
Engine Oil Change

When To Worry About The Light

The check engine light can be a puzzling sight. Many drivers wonder if it signals an oil change. It’s crucial to know when to worry about this light. It can mean different things, not just an oil change. Sometimes, it points to a minor issue. Other times, it hints at something more serious. Understanding the reasons behind the light helps keep your car healthy.

Immediate Actions To Take

Seeing the check engine light demands immediate attention. It’s not wise to ignore it. Here are the steps to take right away:

  • Check the gas cap: A loose or damaged gas cap can trigger the light. Tighten it and see if the light goes off.
  • Inspect oil levels: Low oil levels can cause the light to come on. Use the dipstick to check and add oil if needed.
  • Scan for error codes: Use an OBD-II scanner to read error codes. These codes give insights into what might be wrong.

Sometimes, a trip to a mechanic is unavoidable. They have the tools to diagnose issues. Acting quickly prevents small problems from growing. Immediate actions save time and money.

Potential Engine Damage Risks

Ignoring the check engine light can be risky. It may lead to engine damage. Understanding these risks is key:

  1. Overheating: A malfunctioning cooling system can cause the engine to overheat. This can lead to severe damage.
  2. Oil leaks: Leaking oil reduces lubrication. Parts rub against each other, causing wear and tear.
  3. Faulty sensors: Sensors monitor engine performance. If they fail, the engine may not function correctly.

The table below outlines potential risks:

Risk Consequence
Overheating Engine failure
Oil leaks Increased friction and damage
Faulty sensors Poor engine performance

Addressing these risks quickly is vital. It helps avoid costly repairs. Regular maintenance keeps the engine running smoothly.

Preventative Maintenance Tips

The check engine light can be a source of anxiety for many car owners. It often signals that something might be wrong with your vehicle. But does it come on for an engine oil change? The answer is not straightforward. While the check engine light doesn’t directly indicate the need for an engine oil change, it is a crucial reminder to follow preventative maintenance tips. Keeping up with these tips can help ensure the health and longevity of your engine.

Regular Oil Changes

Regular engine oil changes are vital for keeping your engine running smoothly. Oil lubricates the engine’s parts, reducing friction and preventing overheating. Over time, oil breaks down and becomes less effective. This can lead to increased engine wear and potential damage.

Consider these benefits of regular oil changes:

  • Improved Engine Performance: Fresh oil provides better lubrication, which enhances engine performance.
  • Extended Engine Life: Regular oil changes prevent dirt and debris from accumulating, prolonging engine life.
  • Better Fuel Efficiency: Properly lubricated engines run more efficiently, improving fuel economy.

To keep your car in top shape, follow these simple guidelines:

  1. Change your oil every 3,000 to 5,000 miles, or as recommended by your vehicle’s manufacturer.
  2. Always use the oil type specified in your owner’s manual.
  3. Check oil levels regularly and top up if necessary.

Monitoring Engine Health

Monitoring engine health is another key aspect of preventative maintenance. The check engine light serves as an early warning system, alerting you to potential issues. By staying vigilant, you can address small problems before they escalate.

Here are some tips for monitoring engine health:

  • Listen for Unusual Noises: Strange sounds can indicate underlying issues.
  • Watch for Warning Lights: Besides the check engine light, pay attention to other dashboard alerts.
  • Regular Inspections: Regularly inspect your engine for leaks, corrosion, or worn belts.

Maintaining a routine schedule can help you spot issues early:

Task Frequency
Check engine oil level Every month
Inspect belts and hoses Every 3 months
Examine battery terminals Every 6 months

By following these practices, you can maintain your vehicle’s health and avoid unexpected breakdowns.

Diagnosing The Light

The check engine light can be a source of anxiety for drivers. Many wonder if this warning light indicates a need for an engine oil change. Diagnosing the light is crucial to understanding what your car is trying to tell you. It doesn’t always mean an engine oil change is required. Sometimes, it can signal other issues. Let’s explore how to diagnose this light effectively.

Using Obd-ii Scanner

One of the most efficient methods to diagnose the check engine light is using an OBD-II scanner. This tool can read the error codes from your vehicle’s computer. These codes provide insight into the issue causing the light to illuminate. Here’s how you can use it:

  • Plug the scanner into the OBD-II port: This port is usually located under the dashboard, near the steering wheel.
  • Turn on the ignition: Ensure your vehicle is in the ‘on’ position without starting the engine.
  • Read the codes: The scanner will display error codes. Each code corresponds to a specific problem.

Once you have the codes, you can look up their meanings online or in the scanner’s manual. This helps pinpoint whether the light is related to an oil change or another issue. A table of common codes can be useful:

Error Code Description
P0420 Catalyst System Efficiency Below Threshold
P0171 System Too Lean
P0300 Random/Multiple Cylinder Misfire

Using an OBD-II scanner is a quick way to diagnose the check engine light. It empowers you to understand what your car needs, beyond just an oil change.

Consulting A Professional

Sometimes, the check engine light requires professional attention. If you’re unsure about the codes or what they mean, consulting a mechanic is wise. Professionals have specialized tools and expertise. They can accurately diagnose and address the root cause of the warning light, even if it’s related to an engine oil change issue. Here are a few reasons why consulting a professional is beneficial:

  1. Expertise: Mechanics are trained to interpret error codes and assess car issues comprehensively.
  2. Advanced tools: Professionals have access to advanced diagnostic equipment that can uncover issues not visible to basic scanners.
  3. Reliable repairs: Mechanics can provide reliable solutions and ensure your car operates safely.

While DIY diagnostics can be helpful, a professional can offer peace of mind. They ensure problems are addressed correctly and efficiently. This is especially important if the check engine light persists. Trusting a professional with your vehicle can save time and prevent further damage.

Conclusion Insights

The check engine light can be a confusing signal for many drivers. It often leads to questions about its purpose. Does it indicate the need for an engine oil change? Understanding its role can save you time and stress. Let’s explore what the check engine light means and its relation to engine oil change. This section will provide clarity on this common concern.

Understanding The Check Engine Light

The check engine light is a warning system. It alerts you to potential engine issues. Its illumination can mean many things. From a loose gas cap to a failing oxygen sensor. It’s not specifically tied to oil changes. Regular maintenance checks are essential. They help prevent unexpected problems.

Importance Of Regular Oil Changes

Oil changes are vital for engine health. They keep your engine running smoothly. Old oil can lead to engine wear and tear. Regular engine oil changes help avoid costly repairs. They don’t directly trigger the check engine light. Yet, neglecting them can cause other issues. These might activate the warning light.

Common Triggers For The Check Engine Light

  • Faulty Oxygen Sensor
  • Loose or Damaged Gas Cap
  • Failing Catalytic Converter
  • Malfunctioning Mass Airflow Sensor
  • Worn Spark Plugs or Wires

These issues often illuminate the light. They require immediate attention. Delaying fixes can lead to bigger problems.

Steps To Take When The Light Comes On

  1. Check for simple issues first. Like a loose gas cap.
  2. Visit a mechanic for a diagnostic test.
  3. Address the problem promptly.
  4. Keep up with regular maintenance.

These steps ensure your vehicle stays in good condition. They can also prevent future issues.

Key Takeaways

Aspect Insight
Check Engine Light Not for oil changes. Signals engine issues.
Oil Changes Essential for engine health. Don’t skip them.
Action Steps Diagnose and fix issues quickly. Maintain regular checks.

Understanding your vehicle’s signals can make driving less stressful. Stay informed and proactive.
Engine Oil Change


Frequently Asked Questions

Will The Check Engine Light Come On If I Need An Oil Change?

The check engine light typically does not indicate that an oil change is needed. It signals engine-related issues. Regularly check your oil level and schedule oil changes as per your vehicle’s maintenance guidelines. If the light turns on, diagnose the problem promptly to avoid potential engine damage.

Can A Check Engine Light Come On For Low Oil?

Yes, a check engine light can illuminate due to low oil levels. Low oil can cause engine problems. It’s important to check your oil regularly. Addressing low oil quickly helps prevent potential engine damage. Always maintain proper oil levels to ensure your car runs smoothly.

What Light Will Come On If I Need An Oil Change?

The oil change light typically appears as a yellow or orange icon resembling an oil can. It may also say “Change Oil” or “Service Engine Soon”. Check your vehicle’s manual for specific symbols related to oil changes. Regular maintenance ensures engine longevity and efficiency.

Does The Check Engine Light Come On For Scheduled Maintenance?

The check engine light typically signals issues with the engine or emissions, not scheduled maintenance like an engine oil change. Scheduled maintenance reminders usually appear on the dashboard. Always consult your vehicle’s manual or a professional for accurate information. Regular maintenance, including a timely engine oil change, helps prevent the check engine light from turning on unexpectedly.

Can A Check Engine Light Indicate An Oil Change Is Needed?

No, the check engine light typically signals engine or emission problems. An oil change reminder is separate.

What Does The Check Engine Light Usually Mean?

It often means there’s an issue with the engine or emissions system. A diagnostic check is needed.

Conclusion

A check engine light can signal many issues. An engine oil change isn’t typically one. Regular oil checks prevent engine problems. Keep your vehicle healthy and running smoothly. Ignoring warnings can lead to costly repairs. Address engine lights promptly for peace of mind.

​Consult a mechanic if unsure. Always prioritize safety and maintenance. Simple actions, like a proper engine oil change, keep your car in top shape. Remember, timely care saves money and stress. Stay proactive with vehicle upkeep. Your car deserves attention and care. Follow maintenance schedules diligently.

​Drive with confidence and avoid potential issues. Keep that check engine light off!


How to Check Engine Oil Car: Quick & Easy Method

How to Check Engine Oil


You drive your car every day, but many drivers forget to check their engine oil regularly. Ignoring this simple task can lead to engine damage. Learn how to check engine oil Car the right way.

​But wait—when was the last time you checked your engine oil? This might seem like a small detail, but keeping an eye on your Check Engine Oil Car is crucial for maintaining your car’s performance and longevity. Neglect it, and you could be facing costly repairs or, worse, a breakdown at the most inconvenient time.

​In this guide, you’ll discover how to easily check your car’s engine oil. By the end, you’ll feel confident about this simple yet essential task, making sure your car runs smoothly and efficiently. Let’s get started and make sure your ride is always ready to roll!


Importance Of Engine Oil

Engine oil is the lifeblood of your car. It keeps the engine running smoothly. Without it, the engine could overheat and get damaged. Regular oil checks ensure your vehicle stays in good condition. Knowing how to check oil helps avoid costly repairs. This guide will teach you how to do it.

How to Check Engine Oil

Gather The Necessary Tools

Before starting, gather a few simple tools. You will need a clean rag or paper towel. A flashlight might help if it’s dark. That’s all you need to begin checking the oil.

Park The Car On A Level Surface

Make sure the car is on a flat surface. This gives an accurate oil reading. Turn off the engine and wait a few minutes. This allows the oil to settle in the pan.

Locate The Dipstick

Open the car hood and find the dipstick handle. It usually has a bright color. Pull it out gently and wipe it clean. This helps get a clear reading of the oil level.

Check The Oil Level

Insert the dipstick back fully and pull it out again. Look at the oil level on the stick. There are marks on the stick to guide you. The oil should be between the minimum and maximum marks.

Assess The Oil Condition

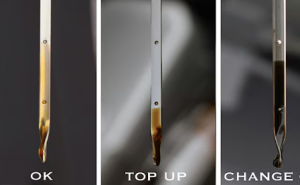
Besides the level, check the oil color. Fresh oil is amber and clear. Dirty oil appears dark and cloudy. If it looks dirty, consider changing it soon.

Tools Needed

 Keeping your car’s engine running smoothly is important. One of the easiest ways is by checking the engine oil. Regular checks can help make sure your engine stays healthy. This guide will walk you through the steps needed to check your engine oil. You don’t need to be a mechanic to do it. With the right tools, anyone can perform this simple task.

Basic Tools

To check the engine oil, you’ll need a few basic tools. A clean rag or paper towel is essential for wiping the dipstick. A flashlight can help you see better in low light. Having gloves will keep your hands clean. Lastly, make sure you have the car’s manual handy. It contains useful information about your vehicle.

Optional Tools

Some additional tools can make the job easier. An oil funnel is helpful if you need to add oil. Safety glasses protect your eyes from any spills. A flat surface to park your car ensures accurate readings. While not necessary, these tools can provide extra safety and convenience.

Preparation Steps

Checking your Check Engine Oil Car is an essential task. It ensures your vehicle runs smoothly and prevents damage. Regular checks help in maintaining the engine’s health. Knowing the right steps to check the oil is crucial. Proper preparation can make this process easy and efficient. Follow these preparation steps for accurate results.

Park On Level Ground

Parking on level ground is important for checking engine oil. It ensures an accurate reading. When the car is tilted, oil shifts in the engine. This can give a false reading. Find a flat surface to park your car.

Here are some key points to consider:

  • Choose a flat parking spot. Avoid hills or sloped driveways.
  • Turn off any distractions. Focus solely on the task.
  • Engage the parking brake. This keeps the car steady.

Use a bubble level if unsure about the ground. This tool helps confirm the ground’s flatness. Accurate parking ensures the oil level is measured correctly. A false reading can lead to unnecessary oil changes or engine issues.

Turn Off The Engine

Turning off the engine is a crucial step. An active engine can give inaccurate oil levels. It also poses safety risks.

Follow these steps:

  • Switch off the ignition. Allow the car to come to a complete stop.
  • Remove the keys. This prevents accidental starts.
  • Ensure all electricals are off. This includes headlights and a radio.

Turning off the engine before checking the oil is vital. It prevents burns from hot parts and ensures a safe environment. This step is necessary for an accurate oil level reading. A running engine can cause oil to splash, leading to incorrect results.

Wait For the Engine To Cool

Waiting for the engine to cool is essential. A hot engine can give an inaccurate oil reading. It also poses safety hazards.

Consider these guidelines:

  • Allow the engine to cool for at least 10 minutes.
  • Check for excessive heat. Feel the hood for warmth.
  • Avoid touching hot engine parts. This prevents burns.

Cooling the engine ensures the oil settles. This provides a true reading of oil levels. A hot engine can cause oil to expand, skewing the results. Patience is key here. Waiting a few minutes can prevent future engine problems.

Checking Oil Level

Regularly checking your car’s engine oil level is crucial for keeping it running smoothly. The engine oil lubricates, cleans, and cools the engine, ensuring optimal performance. Neglecting this simple check can lead to serious engine damage and costly repairs. Understanding how to check the engine oil level can prevent problems before they start. This process is straightforward and can be done in a few minutes. Let’s explore the steps involved in checking your car’s engine oil level.

Locate The Dipstick

Finding the dipstick is the first step in checking your engine oil. The dipstick is usually near the engine, often marked with a bright handle to make it easy to spot. If you are unsure, look at your car’s manual for guidance. Once located, ensure the car is on a level surface. This provides an accurate oil reading. Avoid checking immediately after driving; let the engine cool first. Heat can expand the oil, giving a false reading.

Here are some tips to locate the dipstick:

  • Look for a brightly colored handle. It’s often yellow or orange.
  • Check near the front of the engine. It’s usually within easy reach.
  • Refer to the owner’s manual. It has diagrams and instructions.

Remove And Clean Dipstick

Once the dipstick is located, gently pull it out of the tube. Keep a clean cloth or paper towel handy. It’s essential to clean the dipstick before taking the actual reading. Cleaning removes old oil and dirt, ensuring a clear view of the fresh oil level. Hold the dipstick at a downward angle to prevent oil from sliding back into the tube. Wipe the entire length of the dipstick thoroughly. Check for any signs of dirt or metal particles, which can indicate engine problems.

Cleaning steps include:

  • Pull the dipstick out completely. Do it gently.
  • Wipe with a clean cloth. Remove all oil residues.
  • Inspect for particles. Alert a mechanic if found.

Reinsert and remove the dipstick again

With the dipstick clean, carefully slide it back into the tube. Push it in to get an accurate reading. Ensure the dipstick is fully seated; this is crucial for precision. After inserting, wait a few seconds before pulling it out again. This allows fresh oil to coat the dipstick evenly. Remove the dipstick smoothly to avoid splashing oil. Hold it horizontally to see the oil level. The oil level should be between the marked lines on the dipstick.

Important steps:

  • Reinsert the dipstick fully. Push until seated.
  • Wait a few seconds. Let the oil settle.
  • Pull out smoothly. Check oil level lines.

Read Oil Level

Reading the oil level is the final step. Look at the markings on the dipstick. These lines indicate the minimum and maximum oil levels. The oil should sit between these lines. If it’s below the minimum, your engine needs oil. Above the maximum can be harmful too. Check the color and consistency of the oil. Fresh oil is usually amber and smooth. Dark or gritty oil may need changing. If the level is correct, wipe the dipstick clean and replace it securely.

Things to watch for:

  • Oil level between lines. Add oil if needed.
  • Color of oil. Amber is ideal.
  • Consistency. Smooth, without particles.

Assessing Oil Condition

Checking your car’s engine oil is an essential task. It ensures that your engine runs smoothly. Regular oil checks can help avoid major repairs. Assessing the oil condition is a key part of this process. It involves looking at the color, texture, and smell of the oil. These factors can tell you a lot about the health of your engine. Knowing how to evaluate oil condition can save you time and money.

Color And Clarity

Engine oil color can indicate its condition. Fresh oil is usually amber or golden. Over time, oil darkens as it collects dirt and soot. But dark oil isn’t always bad. It might still perform well. It’s important to check clarity, too. Oil should be clear enough to see through. If it’s cloudy or opaque, it might be contaminated. Here’s a simple method to assess color and clarity:

  • Use a white paper towel to blot some oil.
  • Observe the color against the white background.
  • Check if you can see the paper through the oil.

If the oil is dark but clear, it might be okay. But if it’s dark and cloudy, consider changing it. Regular checks can keep your engine healthy.

Texture And Consistency

Texture and consistency are vital for oil performance. Good engine oil is smooth and slick. It should not feel gritty or thick. Gritty oil can indicate debris or metal particles. This can harm your engine. Thick oil might mean it has been exposed to high heat. Here’s how to test texture and consistency:

  1. Rub a small amount between your fingers.
  2. It should feel smooth and slippery.
  3. If it feels rough or sticky, it may be time to change it.

Regular testing helps you catch problems early. Keeping your oil in good condition extends engine life.

Odor Check

Oil odor can reveal hidden issues. Fresh oil has a mild smell. If you notice a burnt smell, it could be a problem. A burnt odor might mean the oil is old or overheated. This can reduce its effectiveness. Here’s a simple way to check the odor:

  • Smell the oil dipstick carefully.
  • A burnt smell indicates it might need replacing.
  • Also, check for a gasoline smell. This might indicate engine issues.

Regularly checking the oil’s smell can prevent engine damage. It helps ensure your car runs smoothly and efficiently.

When To Change Oil

Engine oil is vital for keeping your car running smoothly. It lubricates moving parts and helps prevent engine wear. Knowing when to change your oil is crucial to maintaining your vehicle’s health. Regular checks can save you from costly repairs. Understanding mileage recommendations and oil condition indicators can help you decide the right time for an oil change.

Mileage Recommendations

Mileage recommendations are essential for scheduling oil changes. Most car manufacturers suggest changing oil every 3,000 to 5,000 miles. This can vary based on driving conditions. Frequent short trips might require more frequent changes. High-speed driving and towing heavy loads can also affect oil life. Check your car’s manual for specific advice.

Some cars have oil life monitoring systems. These systems track the condition of your oil and alert you when a change is needed. Always consider these alerts seriously. Here are some general guidelines:

  • 3,000 miles: For older cars or extreme driving conditions.
  • 5,000 to 7,500 miles: Most modern vehicles under normal conditions.
  • 7,500 to 10,000 miles: Some synthetic oils can last longer.

Remember, these are general suggestions. Your car might have different needs. Regular checks will ensure your engine remains in good shape.

Oil Condition Indicators

Oil condition indicators help you assess the state of your engine oil. A visual check is the simplest method. Fresh oil is clear or slightly amber. Dirty or dark oil means it’s time for a change. Look out for metal particles or a burnt smell; these are signs of engine issues.

Most cars have dipsticks for checking oil levels. Pull out the dipstick and wipe it clean. Insert it back and remove it again. Check the oil level against the markings. If it’s low, consider topping up or changing the oil.

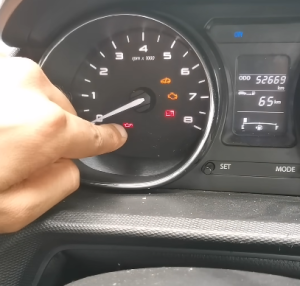
Some vehicles have dashboard warning lights. These lights indicate low oil levels or poor oil quality. Don’t ignore these warnings; they prevent serious engine damage.

In summary, keep an eye on the color, smell, and level of your engine oil. Regular monitoring helps you stay ahead of any potential issues. This will ensure your car runs efficiently.

Common Mistakes

 Check Engine Oil Car is crucial for its health. It ensures that your engine runs smoothly and efficiently. Regular checks help catch problems early, saving you from costly repairs. But many car owners make mistakes when checking oil. This can lead to engine damage or reduced performance. Understanding these common mistakes helps you avoid them.

Not Checking Regularly

Many car owners skip regular engine oil checks. This is a big mistake. Regular checks are essential for maintaining engine health. It helps you spot issues like low oil levels or contamination. Here are some reasons why regular checks are important:

  • Prevents engine damage: Low oil levels can cause engine parts to wear out.
  • Improves fuel efficiency: Clean oil helps the engine run smoothly.
  • Increases engine life: Regular checks ensure your engine stays in good condition.

Experts suggest checking your car’s oil every month. This ensures that your car runs smoothly. It’s a simple task that takes only a few minutes. Make it a habit, and your car will thank you.

Ignoring Warning Lights

Many drivers ignore warning lights on the dashboard. This is dangerous. Warning lights signal issues that need attention. Ignoring them can lead to serious problems. Here’s why you shouldn’t ignore them:

  • Early detection: Warning lights alert you to issues before they become serious.
  • Prevents breakdowns: Addressing issues quickly can prevent costly repairs.

If you see a warning light, check your oil level immediately. Consult your car’s manual for guidance. It will help you understand what each light means. Taking action promptly can save you a lot of trouble.

Overfilling Oil

Adding too much oil can be harmful. Overfilling can cause the oil to foam. This reduces its ability to lubricate the engine. Here’s why overfilling is a mistake:

  • Causes leaks: Excess oil can increase pressure, causing seals to leak.
  • Reduces performance: Too much oil can make the engine work harder.
  • Increases emissions: Overfilling can lead to higher exhaust emissions.

To avoid overfilling, always check the oil level with the dipstick. Follow the instructions in your car’s manual. It will guide you on the correct oil level. Be cautious and precise when adding oil.

Tips For Maintenance

Maintaining your Check Engine Oil Car is crucial for its performance and longevity. Regular checks and proper maintenance can prevent costly repairs and ensure your vehicle runs smoothly. This guide will help you understand how to check your engine oil and offer tips for maintaining it effectively.

Regular Checks

Checking your engine oil regularly is essential for your car’s health. Aim to check it at least once a month. Consistency is key to spotting issues early. Follow these steps:

  • Park your car on a level surface.
  • Turn off the engine and let it cool for a few minutes.
  • Open the hood and locate the dipstick.
  • Pull out the dipstick and wipe it clean with a cloth.
  • Insert the dipstick back fully and pull it out again.
  • Check the oil level, which should be between the two marks.
  • If it’s low, consider adding more oil.

Regular checks help catch potential problems early. Low oil levels can cause engine damage. Checking also lets you see the oil’s color and condition. Dark oil may need replacing soon.

Using Quality Oil

The type of oil you use affects your engine’s performance. Quality oil ensures better lubrication and reduces wear. Consider these factors when choosing oil:

Factor

Importance

Viscosity

Ensures smooth flow and protection.

Brand

Reputable brands offer reliable products.

Type

Synthetic oils often perform better.

Price

Cheap oils may compromise quality.

Using the right oil improves engine efficiency and lifespan. Consult your car’s manual for recommendations. Avoid using low-grade oil; it can lead to engine issues.

Keeping Records

Tracking your oil changes helps maintain your car’s health. Recording oil changes provides a maintenance history. This is useful for spotting patterns and planning future maintenance.

Consider these tips for keeping records:

  • Note the date and mileage of each oil change.
  • Record the type and brand of oil used.
  • Keep receipts or invoices for reference.
  • Use a notebook or digital app for convenience.

Keeping records helps you remember when the next oil change is due. It also aids in assessing the oil’s performance over time. A well-documented history can enhance your car’s resale value.


Frequently Asked Questions

Do You Check The Oil When The Engine Is Hot Or Cold?

Check the oil when the engine is cold for accurate readings. A cold engine makes sure the oil settles in the pan. This provides a precise measurement of the oil level. Always park on a level surface before checking to prevent skewed results. Avoid checking immediately after driving.

What Is The Proper Way To Check Oil In A Car?

To check your car’s oil, park on a level surface and turn off the engine. Let it cool for a few minutes. Open the hood and locate the dipstick. Pull it out, wipe it clean, reinsert fully, and remove again.

Check the oil level against the markers on the dipstick.

How Do You Know If Your Car Oil Is Low?

Check the oil dipstick under the hood. Make sure the engine is off and cool. Pull out the dipstick, wipe it, then reinsert. Withdraw again and examine the oil level against the marked indicators. The low oil level is below the minimum mark.

Regularly monitoring prevents engine damage.

How Do You Know If Your Car Needs Oil?

Check the oil level using the dipstick. Look for warning lights on the dashboard. Listen for engine noises like knocking or ticking. Monitor for increased engine temperature or poor performance. Regularly inspect for oil leaks under the car.

How Often Should You Check Engine Oil?

Check engine oil every month. Regular checks ensure optimal engine performance and longevity. Always maintain proper oil level. 

What Tools Are Needed To Check Engine Oil?

You need a clean rag and the car’s dipstick. These are enough for a simple oil check.

Conclusion

Checking your car’s engine oil is easy and important. Regular checks ensure your engine runs smoothly. Follow simple steps to keep your car healthy. Remember to park on level ground. Wait until the engine cools. To check the engine oil, pull out the dipstick, wipe it clean, and reinsert it.

​Check the oil level and color. Top up if necessary. Clean oil extends your car’s life. It prevents costly repairs and breakdowns. Stay proactive with engine oil maintenance. Your car will thank you for it. You now know how to check the engine oil car.

​Keep practicing, and it will become second nature. Happy driving!